Tires require an optimal amount of air to function well and it is always a good idea to check the tire pressure before a ride.
Popularly, there are two main types of tube valves;
1. Schrader Valve: This tube valve is wide and flat in the end.
2. Presta Valve: This tube valve is narrower and has a locking nut at the top. The locking nut can be loosened to add or release air. releasing the air is quite easy, it is done by loosening the locking nut then pressing to let the air out.
Using a Schrader pump for a Presta valve will not work out, which is the reason why it is necessary to confirm the type of valve your bike uses in order to get the correct bike pump.
Now, the following procedures are to be followed to successfully install and pump your bike with the optimal pressure.
1. Remove the plastic cap usually covering the end of your valve (Not having the plastic cap on your valve does not cause any alarm as it is not really important).
2. If you are using Presta valves unscrew the locking nut at the top and give it some taps to confirm it’s moving. You should notice air coming out of it. (This step can be skipped for Schrader valves)
3. Before pumping, check the psi (pounds-per-square-inch) range that can be handled by your tire. It should be found on the sidewall of your tire and normally a road tire is between 80 and 130 PSI, while hybrid tire goes between 40 and 70 PSI. A mountain tire is around 25 and 50 PSI.
4. Attach the head of the pump to the valve. The pump can have a switch that flips up or flips down or an internally threaded screw top. They are there in order to keep the head in shape while you are pumping, and also make sure that air goes into the valve without leaking out in the pumping process. If there is any issue pumping, adjust the pump or restart the process.
5. Pump the tube to your optimal pressure using the gauge on your pump as a guide.
Once you’re done pumping to your optimal pressure, switch the pump head to turn it off And tighten the locking nut before replacing the plastic valve cap.
CHOOSING A BIKE PUMP
Quick Navigation
There are different types of bike pumps. Here we will be exploring the three main options you can choose from.
Floor pump
The floor pump is a big, efficient, and fastest way of inflating your tires. It allows you to pump using both hands at once which pushes a very large amount of air into your tires with every stroke. The drawback of this type of pump is that they’re quite big and cannot be carried about easily. Floor pumps are most suitable for home use, however, a more portable pump will be recommended for road use.
Portable bike pump
The downside of the floor pump is the major advantage of a portable bike pump. It is very light and portable which makes it easy to be carried about. It also features an extending air hose and head system for connecting to tire valves. It works for both Presta and Schrader valves, and also comes with a mounting kit for fitting your pump to your bike.
CO2 tire inflator
This type of bike pump is also portable, light, and compact. It can be easily stashed in a pocket or a bag. They use CO2 cartridges and each cartridge can pump 1-2 flat tires in seconds. They do not require elbow grease. The drawback of this type of pump is that you must make sure you have a stock of cartridges. (Cartridges are also available for sale online).
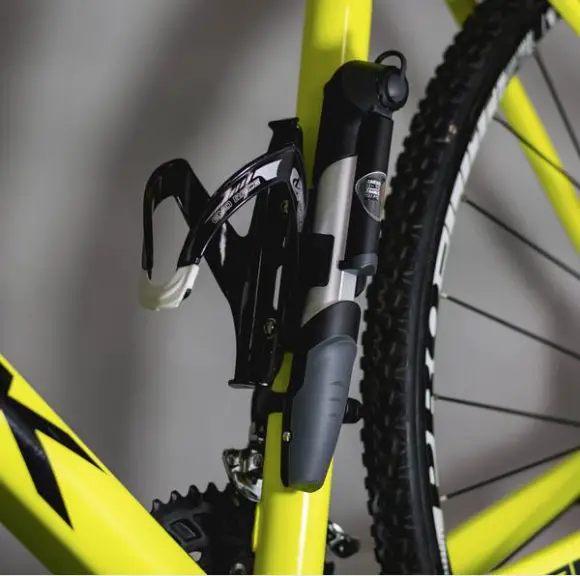
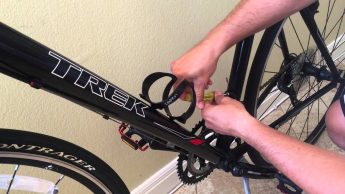
HOW TO FIX A BIKE PUMP TO YOUR BIKE
Identify where to mount the pump on your bike: You need to look for a length of frame tubing longer than your pump, and such where it will not go in the way of movement.
With this, there are three suggested locations where you can mount your bike pump;
i. The downtube (The handlebars down to pedals)
ii. The crossbar (The handlebars to the saddle)
iii. The seat tube ( The saddle to the pedals)
Try identifying these three locations on your bike and find the most suitable for your bike. You can then use reusable zip ties or pump mounting straps to attach it to the identified location on your bike.
The importance of carrying a pump with your bike all the time cannot be overemphasized. Although it can vary depending on the type of ride you do. If you never ride too far from home you may not necessarily need a pump. But if you ride considerable distances and help is not always around then you need a pump. Be sure the pump is capable of inflating your tire.
Additionally, there are styles of riding to which frequent pressure changes are of importance. Take winter cycling races for example. Over a long course, you might need to put additional air to adapt tires to changing trail conditions.
It is also advisable to carry a repair kit in addition to your pump. A repair kit should contain a spare tube, tire levers, and patch kit. It comes into use in cases of a puncture which is a sizable hole in the tube. When you have this hole in your tube, pumping alone cannot fix it as your tire would start to deflate almost immediately you’re done inflating.
The reason you need to carry a repair kit is so that your ride doesn’t come to an end in case of flats. With practice you can fix a flat in 5 minutes which saves you the hassle of pushing the bike, getting a public bus, or any other means you might consider.
In conclusion, it is better you have your pump and your repair kit with you as you ride.