
Introduction
Quick Navigation
Before you attempt wrapping your tape correctly, below are a few things to note.
Be precise and firm with the tape. It won’t break or rip effortlessly. Utilize all the bar tape given and keep it straight. Start-up by rinsing your hands so you don’t smear your fresh tape before you’ve even commenced the task.
Avert putting on mechanics’ latex gloves as you require to feel the tape in your fingers. Endeavour that any brake or gear abode is taped legitimately to the handlebar with PVC tape, and your bar is unrestricted of sticky debris.
Get your tools in order
Before enrolling your bar tape, get the finishing lines ready, or shred slim PVC tape into two 5cm pieces. You will also require scissors instead of hands.
Begin the wrap
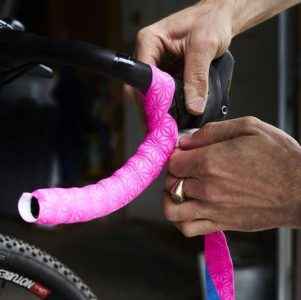
Begin at the underside of the bar on the right hand drop and overlap half the width of the tape from the end.
This additional tape is packed into the verge of the bar and finalized with a bar pin. It safeguards you if you fall on the bar and carries the bar plugs in position.
See more for further details
Occur simultaneously and wrap from the inside to the outside
Wrap from the inward out in a clockwise fashion for the right-hand drop. Overlap the tape by a quarter to a third. Attempt to keep it as even as probable. That way, the tape will be fastened by the grip of your hands. If you wrap anti-clockwise, as you normally twist your wrist and hands you will untie or unfold the tape.
The figure of 8 at the hoods
To drape the tape around your brake hood, you will require to obey a figure of eight. It will clasp the tape more securely.
Swirl the rubber of the hoods ahead. Carry the tape under the lever body and up the inside. Wrap over the lid and under the drop. Reach back under the lever body to the outside and carry the tape back inside the drop and up to the top of the bar.
Wrap the hood back to be sure no gaps are revealing and the figure of eight is encircling the bar. Don’t be scared to undo and re-wrap so that you get it perfect.
Wrap along the top
Proceed with wrapping the bar tape from inward to out, in a clockwise style as you did previously. Recall try to drape everything with not too much extension.
Halt at the bulge or where the handlebar becomes larger
Once you attain the swell of the handlebar or you think you have only one extra rotation left, fasten the tape and trim away the abundance with a long oblique cut.
Use the finishing tape recharged in the box or electrical tape to conserve the end.
Push in the bar end plug and duplicate
Duplicate for the left-hand side of the bar. Know you are draping from the inside of the bar outwards. This will be an anti-clockwise gesture.
Wrap It Right and Tight
Partly peel off the new bar tape’s sticky backing, you’ll scrape off more as you go. With the tape in your preferred direction clockwise or counterclockwise, begin at the end of the bar with the sticky strip stroking the edge of the bar, and the rest hanging off. Begin draping the handlebars, occurring simultaneously to a third to half of the tape’s width as you move.
Stop for Brake Detail
Lots of new tapes arrive with two short pieces. If not, slash a 3-inch piece from each roll before you commence wrapping. Utilize these to wrap the brake-lever pins. Not minding your preliminary direction, constantly wrap the top, a flat column of the bar with the tape getting on over the top of the bar, toward the rider, your hands will normally work to expand the tape as you ride. When draping to the outside, you need to alter direction at the lever clamp. To do that, coat as close as feasible to the clamp, extending it over by one-half to three-quarters the width of the tape. Thus, wrap under the clamp at the front of the bar, up against the interior of the clamp, and over the top of the bar, existing side-by-side the clamp slightly.
Mind the gap
Most bar tape arrives with two minor categories of tape periodically called cheater pieces that are manufactured to make it susceptible to conceal the minor gap left when you wrap around the brake buttons.
It is a streak of pride for any good technician to be eligible to drape their bars without utilizing the cheater piece, and it’s not that hard in the method.
Clench these in place behind the buttons and drape over the top.