
Introduction
Quick Navigation
When you buy a football sports jersey, customizing your name on the jersey makes it feel more personal and more people are likely to associate you with that football team or club. This is the case with Cyclers and bicycles. Over the years, Bike manufacturers have constructed amazing bikes and athletes have used these bikes to win championships and dominate the game. However, when it comes to one’s choice of bicycle, nothing will beat a bicycle that is uniquely made to fit your own taste and preferences. Building your own bicycle might seem like a herculean task. However, once you know the routes you want to ride on and the kind of bike that fits your riding style, you would be able to identify the specific types of parts you need and the tools required to assemble the bike. At this point, you can easily reach out to another cycling friend to help you in the process of building the bike. In this article, you would learn the parts you need to build your own bike, the tools required in this process and step by step guide on how to assemble your bike. Enjoy!
Important parts you need to build your own bike
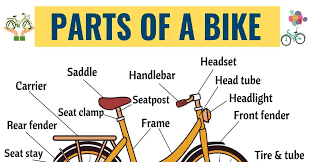
When you want to start building your bike, the first challenge is gathering all the right parts. We have a host of articles describing different bike parts on this platform and you should check out the ones that fit your style best. All the bike parts you need include; Frame (Aluminum, Carbon fiber or steel), fork, headset, brakes (rim, disc or drum), front derailleur, rear derailleur, stem, wheels and tires, brake pads, shifters, handlebars, brake levers, seat post, saddle, bike chain and pedals. When you have all these parts, then you should pick a spacious and well-lit space to set up workshop.
Important tools you need to build your own bike
If you are building anything, you would need tools. Some of the important tools you need to get if you want to build your own bike includes; Allen wrench, grease, chain tool, hacksaw, nuts/bolts, wire cutters, pedal wrench, bottom bracket tool, screw driver, adjustable wrench and other relevant tools. When you have all these tools, then you can go ahead with the construction.
Step-by-step guide on how to build your own bicycle
- Setup the seat post
- Setup the Headset
Insert your seat clamp on the frame and then insert the post. Once you do this, make sure you grease the area where the post and frame come into contact. Once you are done, put the seat on the post.
You should go ahead and install the headset. You should start by setting up the cups with a large bolt, some washers and a nut so it can be perfectly pressed into place. You can grease the cups and press the race.
- Setup the Fork
At this point, you should arrange your headset, grease the bearings, insert your stem and other spacers, then mark a spot on the fork. Take the fork out and then cut it 3mm below the spot you marked. Make sure you cut it precisely where you marked it.
- Insert the bottom bracket
The next step should be to install the bottom bracket. You should grease up the threads and start by threading it in with your hand. After you have made progress, tighten both the drive side and the non-drive side of the reverse bottom bracket. The drive side will sit on the bottom bracket shell while the non-drive will still stick out a little. Before you begin, remember that the drive side is reverse threaded and it goes backwards.
- Insert the Cranks
The next thing should be to insert the cranks. You can grease it before you tighten it or you can do it directly.
- Install the pedals
Before you begin installing the pedals, you should know that the non-drive side is reverse threaded. When you want to install your pedals, you should make sure you grease the threads appropriately and then fix them. A 15mm wrench is mostly used to install pedals.
- Install your derailleur
If you use but front and rear derailleur, then make sure you place it carefully so that it doesn’t cross thread.
- Install the brakes
You should install your brake pads in the frame. However, you should be ready to adjust the tightness accordingly when you are done constructing the bike.
- Insert the bike chain
When you are ready to insert the chain, make sure that the chain is long enough to spin around smoothly. During this process, you should use your chain tool to drive the pin through and then use the inner step to loosen the link. If your chain is still stiff, then you should repeat the process until it feels free enough.
- Install your brake cables
Your brakes and shifters will require cable housing and you have to make sure that you have enough cable so it won’t keep your bar from turning away. Your cable should be enough to turn for as much as you want it to turn.
- Bring it all together
At this point, you can run your cables to your brakes and derailleurs now. When you run all the appropriate cables, you can adjust and fine tune them by using the barrel adjuster.
- Test your bike
At this point, your bike should be fully built and ready for a test run.
Conclusion
The one drawback that comes with products that are already finished is that they cannot take care of your needs completely. There will always be a feature that you want which will be absent in that product. However, when you have something that is custom-made for you, you can be sure that you will get everything you like in one place. If you are cycler and you want your bike to fit all your riding needs perfectly, then you have to be bold enough to try building that bike for yourself. This article has outlined the necessary parts and important tools you would need to build a functioning bicycle. We have also outlined a step-by-step plan on how to go about this process. If you are still unsure of how to proceed then you should make further research or ask a friend for help. Cheers!